Showing posts with label pattern alterations. Show all posts

Monday, February 29, 2016

Shoulder Adjustment

The shoulder adjustment is usually needs to be done to a bodice or dress with a sleeve.  It needs to be done if your shoulders rotate to the front which causes the shoulder seam sit to the back and also the sleeve will have a lot of dragging and it won't sit very well.


If you look at the image below you'll see the following:
  • the shoulder seam sits to the back
  • the shoulder point site more to the front
  • and the sleeve has a bit too much fabric in the head at the back


So, when the Shoulder Adjustment is done the shoulder will sit forward and also the sleeve head notch will sit forward as well.


Ok, so let's get started.


Step 1 - After you've done your fitting and you've worked out how much you want the shoulder to come forward by you'll need to transfer that amount to the pattern - in the image above we'll need to move the shoulder forward by 2.5cm/1".


Step 2 - Measure down from the shoulder line the amount you need to adjust the shoulder line - in this case it's 2.5cm/1".


Step 3 - Cut through that line to create two separate pieces. NOTE: Don't forget to add a 1cm/3/8" seam allowance to the front shoulder line.
Step 4 - Add the front piece you cut to the back shoulder line - BUT make sure you come down 1cm.  This is to subtract the seam allowance from the back shoulder.
Now, redraw the neckline in.

Step 5 - Draw a line at the head of the sleeve just above the front and back notches.
Step 6 - Cut the line to separate the 2 pieces.
Step 7 - Move the top piece over to the front the amount you adjusted the shoulder - in this case it's 2.5cm/1".
Step 8 - Redraw the sleeve head.

That's it!  You've now made a Shoulder Adjustment to your bodice.

Happy Sewing!


Ann Martin is the owner/designer of 1 Puddle Lane - Pattern Studio.
With over 30 years experience in the Fashion Industry she brings a wealth of knowledge on everything from Patternmaking and Sewing to Design.
Ann currently lives in Australia and is always working on new pattern designs to create.   1puddlelane.com.au

Monday, February 15, 2016

Doing an FBA (Full Bust Adjustment)

What the heck is an FBA,  I hear you say?

Well, today I'm going to teach you what it is and how to do it.


What is an FBA?

FBA - short for Full Bust Adjustment - is an adjustment done to the front bodice pattern so that your bodice will fit around your boobs without pulling, creeping, flattening your boobs when you wear your bodice/dress.  

It's a way of adding cm's/inches to your pattern - just at the front where you need it and not at the back where you don't need it.

And an FBA is done to a big bust.  Most patterns are made for a B-C cup so if you are a D, E, F, G etc. you'll need to do an FBA to your pattern.


How do you do an FBA?


For this tutorial I've chosen my MiSS FOX DRESS pattern.  It has a bodice and skirt and the bodice is made for a C cup.  So if you are over a C cup then you'll need to do an FBA.


Let's get started:

Step 1 - You'll need to take an Upper Bust Measurement (B) and Full Bust Measurement (A).  The UBM will go around you above your bust and up under your armholes.  The FBM - you'll measure around the fullest part of your bust.

Step 2 - Let's say your UBM (B) is 40" and your FBM (A) is 44".  That is a difference of 4".  So, you'll need to add 4" to your front bodice pattern.

Step 3 - Find the size you'll be starting with by using your UBM which is 40".

Step 4 - The above image shows that Size 14/10 has a bust of 40".  So you'll be using Size 14 and not a Size 18.....that is good news!

Step 5 - Trace out your Size 14 pattern and let's begin the FBA.
Step 6 - Rule a line - parallel to the CF (Centre Front) - that goes from the shoulder to the waist through the waist bust dart point.
Step 7 - Rule a line from your first line out to the middle of the bust dart through the side bust dart point.

Step 8 - Now rule a line from the bust dart point up to the armhole nick.
Step 9 - Finally rule a line at a 90 degree angle to the CF, half way between the waist bust dart point and waist line.
Step 10 - Ok, now you've got your lines ruled up you'll now be cutting these lines.  Note:  you won't be needing the line from the shoulder to the bust point.


Step 11 - Place some extra paper under your pattern.  
  • Now cut the line from the waist to the bust point and out to the armhole - don't cut right to the end.  Leave about .5cm attached.
  • Now cut the line of the bust dart but don't cut right through.  Leave about .5cm attached. 
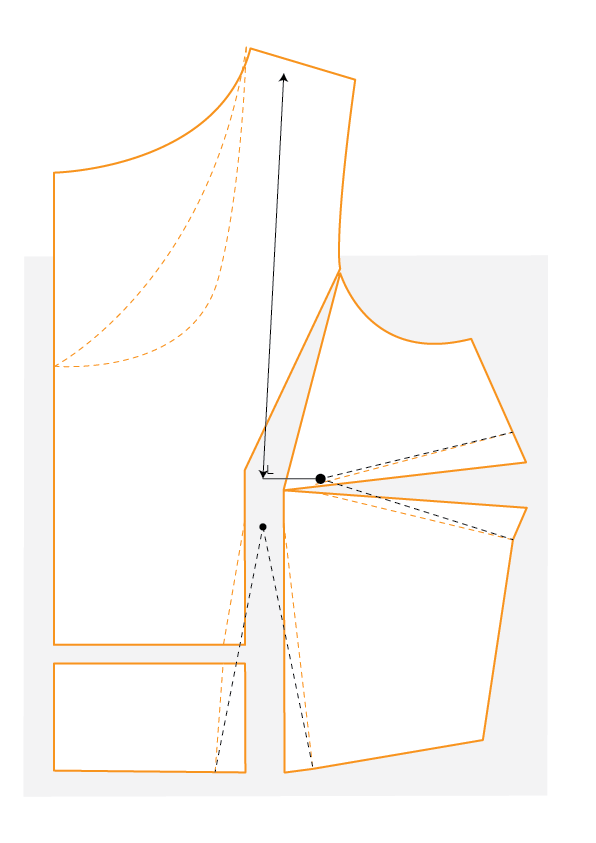
  • Keep the CF stationary and open the waist to armhole line out the measurement you need.  In this case the UBM is 40" and the FBM is 44".  So that's a difference of 4".  As you only need to add the 4" to the front and the pattern piece is half of the whole front you would divide the 4" by 2 which will give you 2".  So you'll need to spread the pattern pieces 2".  That will then open out the side bust dart.

Step 12 - Lastly, cut the line from the CF to the waist bust dart and move it down so that the bottom edges are level.

Step 13 - To Redraw the Darts - at the waist bust dart point find the half way point.  In this case it's 2.5cm/1".  Mark a dot and then draw in the new dart from the waist up to the dart point and then down to the waist.  Sticky tape or glue pattern pieces in place.

Step 14 - To Redraw the Side Bust Dart, you'll need to do a measurement from your shoulder to nipple to find out where you need to start your dart from.  
  • So take that measurement and rule a line down from the shoulder to the bust point parallel to the CF.  Mark a dot for the bust point measurement. This dot should be in line with the dot your marked for the waist bust dart.
  • Now rule a line out at a 90 degree angle to approx. where the side bust dart point begins and mark a dot.
  • Rule a line from the side seam notch of the dart to the dot at the bust and then back out again to other side seam notch of the dart.


Step 15 - All you need to do now is true up the waist and side bust darts.  So, fold the waist dart toward the CF and redraw the waist line with a tracing wheel and fold your side bust dart up and redraw the side seam with a tracing wheel.

Tahah!  You've now done an FBA to your bodice pattern.  Well done!

I hope this has answered all your questions regarding an FBA.  If you enjoyed this tutorial why not pop over to my fb group and get more help to your questions.

Till next time - Happy Sewing!


Ann Martin is the owner/designer of 1 Puddle Lane - Pattern Studio.
With over 30 years experience in the Fashion Industry she brings a wealth of knowledge on everything from Patternmaking and Sewing to Design.
Ann currently lives in Australia and is always working on new pattern designs to create.    1puddlelane.com.au

Wednesday, October 29, 2014

Sway Back Adjustment

The Sway Back issue happens when there is too much excess fabric at the back around the waistline but the front fits ok.  So you need to get rid of the excess out of your pattern so that it sits better at the back.
As I've stated in my other tutorials on Altering your Pattern you must sew up a Toile/Muslin of your pattern first so that you can fix all the fitting problems that are happening so that you don't get discouraged and end up throwing your garment in the corner never to be seen again.  I know I've been there!


This back bodice is too long and too wide but for this tutorial I'll just be showing you how to take the excess out at the lower back  or Sway Back Alteration.

Step 1

  • Pin the excess out from the CB to the side seam.  It will end up looking like a dart.
  • If you find you need to take the excess out right round to the front then it's not a Sway Back problem it's just a Front and Back Length problem ie. The Front and Back length is too long for your body.

Step 2 
  • Transfer that measurement to your pattern.  It should end up looking like a dart.


Step 3
  • Fold the dart in and secure with tape.


Step 4
  • Draw a line down the back seam.


Step 5
  • Cut away the excess and transfer that to the side seam.
  • Redraw the back seam line.

Step 6
  • Redraw the back dart.
  • To do this measure from the top of the dart to the CB seam.
  • That measurement should be the same for the centre of dart at the bottom.
  • Mark in the centre of the dart and draw the new dart lines in either side.

That's it you are done.  The Sway Back pattern alteration has now been fixed.  


Gaping Neckline Adjustment

A gaping neckline can be a real pain in your finished dress.  So here is how you can fix it:

Before you start sewing your pattern you must do this important step -

MAKE A TOILE/MUSLIN FIRST of the bodice or dress to nut out any fitting problems.  That way there will be no tears at the end and another outfit thrown in the corner because it doesn't fit.

Ok, so you've made your Toile - now is the time to try it on and see what fitting problems you have with your pattern.


The problem I see for this Toile is the gaping front neckline and also the fitting at the bust.  But for this lesson I'll just address the gaping front neckline.

All a gaping neckline means is that the across chest is too big for you.  So the across chest needs to be taken in.


Step 1 
  • pin in the excess fabric at the neckline making sure that you continue this down to nothing.  It will end up looking like a dart and it should finish around just above the bust.  If it goes lower than the bust almost to the waist - then your problem is that you have chosen a size too big for you.
Step 2
  • Now to transfer that amount of excess to your pattern.
  • Measure down to the point where the excess fabric dart finishes.
  • Mark that on your pattern and square a line out to finish at the seam.

Step 3
  • Now draw a line up to the neckline - say half way between the CF and the shoulder.
  • Measure how much needs to be taken out of the pattern and halve it.
  • Mark that amount on the pattern to the right of the first line at the neckline and draw a line back down to the first point.


Step 4
  • Now fold the dart in and secure with tape.  This is the time now to redraw the neckline if it needs it.
  • The same amount of excess needs to also be taken out of the front neck facing.

And that's it ladies - I hope this has helped one aspect of making an outfit fit your properly.  And now you are ready to make a gorgeous new outfit for yourself.