Showing posts with label patternmaking. Show all posts

Monday, February 29, 2016

Shoulder Adjustment

The shoulder adjustment is usually needs to be done to a bodice or dress with a sleeve.  It needs to be done if your shoulders rotate to the front which causes the shoulder seam sit to the back and also the sleeve will have a lot of dragging and it won't sit very well.


If you look at the image below you'll see the following:
  • the shoulder seam sits to the back
  • the shoulder point site more to the front
  • and the sleeve has a bit too much fabric in the head at the back


So, when the Shoulder Adjustment is done the shoulder will sit forward and also the sleeve head notch will sit forward as well.


Ok, so let's get started.


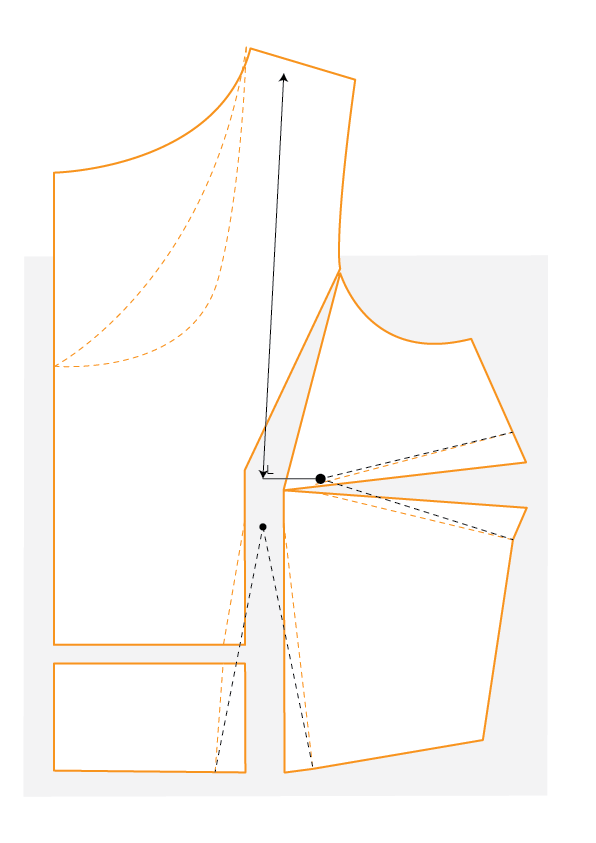
Step 1 - After you've done your fitting and you've worked out how much you want the shoulder to come forward by you'll need to transfer that amount to the pattern - in the image above we'll need to move the shoulder forward by 2.5cm/1".


Step 2 - Measure down from the shoulder line the amount you need to adjust the shoulder line - in this case it's 2.5cm/1".


Step 3 - Cut through that line to create two separate pieces. NOTE: Don't forget to add a 1cm/3/8" seam allowance to the front shoulder line.
Step 4 - Add the front piece you cut to the back shoulder line - BUT make sure you come down 1cm.  This is to subtract the seam allowance from the back shoulder.
Now, redraw the neckline in.

Step 5 - Draw a line at the head of the sleeve just above the front and back notches.
Step 6 - Cut the line to separate the 2 pieces.
Step 7 - Move the top piece over to the front the amount you adjusted the shoulder - in this case it's 2.5cm/1".
Step 8 - Redraw the sleeve head.

That's it!  You've now made a Shoulder Adjustment to your bodice.

Happy Sewing!


Ann Martin is the owner/designer of 1 Puddle Lane - Pattern Studio.
With over 30 years experience in the Fashion Industry she brings a wealth of knowledge on everything from Patternmaking and Sewing to Design.
Ann currently lives in Australia and is always working on new pattern designs to create.   1puddlelane.com.au

Monday, February 15, 2016

Doing an FBA (Full Bust Adjustment)

What the heck is an FBA,  I hear you say?

Well, today I'm going to teach you what it is and how to do it.


What is an FBA?

FBA - short for Full Bust Adjustment - is an adjustment done to the front bodice pattern so that your bodice will fit around your boobs without pulling, creeping, flattening your boobs when you wear your bodice/dress.  

It's a way of adding cm's/inches to your pattern - just at the front where you need it and not at the back where you don't need it.

And an FBA is done to a big bust.  Most patterns are made for a B-C cup so if you are a D, E, F, G etc. you'll need to do an FBA to your pattern.


How do you do an FBA?


For this tutorial I've chosen my MiSS FOX DRESS pattern.  It has a bodice and skirt and the bodice is made for a C cup.  So if you are over a C cup then you'll need to do an FBA.


Let's get started:

Step 1 - You'll need to take an Upper Bust Measurement (B) and Full Bust Measurement (A).  The UBM will go around you above your bust and up under your armholes.  The FBM - you'll measure around the fullest part of your bust.

Step 2 - Let's say your UBM (B) is 40" and your FBM (A) is 44".  That is a difference of 4".  So, you'll need to add 4" to your front bodice pattern.

Step 3 - Find the size you'll be starting with by using your UBM which is 40".

Step 4 - The above image shows that Size 14/10 has a bust of 40".  So you'll be using Size 14 and not a Size 18.....that is good news!

Step 5 - Trace out your Size 14 pattern and let's begin the FBA.
Step 6 - Rule a line - parallel to the CF (Centre Front) - that goes from the shoulder to the waist through the waist bust dart point.
Step 7 - Rule a line from your first line out to the middle of the bust dart through the side bust dart point.

Step 8 - Now rule a line from the bust dart point up to the armhole nick.
Step 9 - Finally rule a line at a 90 degree angle to the CF, half way between the waist bust dart point and waist line.
Step 10 - Ok, now you've got your lines ruled up you'll now be cutting these lines.  Note:  you won't be needing the line from the shoulder to the bust point.


Step 11 - Place some extra paper under your pattern.  
  • Now cut the line from the waist to the bust point and out to the armhole - don't cut right to the end.  Leave about .5cm attached.
  • Now cut the line of the bust dart but don't cut right through.  Leave about .5cm attached. 
  • Keep the CF stationary and open the waist to armhole line out the measurement you need.  In this case the UBM is 40" and the FBM is 44".  So that's a difference of 4".  As you only need to add the 4" to the front and the pattern piece is half of the whole front you would divide the 4" by 2 which will give you 2".  So you'll need to spread the pattern pieces 2".  That will then open out the side bust dart.

Step 12 - Lastly, cut the line from the CF to the waist bust dart and move it down so that the bottom edges are level.

Step 13 - To Redraw the Darts - at the waist bust dart point find the half way point.  In this case it's 2.5cm/1".  Mark a dot and then draw in the new dart from the waist up to the dart point and then down to the waist.  Sticky tape or glue pattern pieces in place.

Step 14 - To Redraw the Side Bust Dart, you'll need to do a measurement from your shoulder to nipple to find out where you need to start your dart from.  
  • So take that measurement and rule a line down from the shoulder to the bust point parallel to the CF.  Mark a dot for the bust point measurement. This dot should be in line with the dot your marked for the waist bust dart.
  • Now rule a line out at a 90 degree angle to approx. where the side bust dart point begins and mark a dot.
  • Rule a line from the side seam notch of the dart to the dot at the bust and then back out again to other side seam notch of the dart.


Step 15 - All you need to do now is true up the waist and side bust darts.  So, fold the waist dart toward the CF and redraw the waist line with a tracing wheel and fold your side bust dart up and redraw the side seam with a tracing wheel.

Tahah!  You've now done an FBA to your bodice pattern.  Well done!

I hope this has answered all your questions regarding an FBA.  If you enjoyed this tutorial why not pop over to my fb group and get more help to your questions.

Till next time - Happy Sewing!


Ann Martin is the owner/designer of 1 Puddle Lane - Pattern Studio.
With over 30 years experience in the Fashion Industry she brings a wealth of knowledge on everything from Patternmaking and Sewing to Design.
Ann currently lives in Australia and is always working on new pattern designs to create.    1puddlelane.com.au

Wednesday, October 14, 2015

MiSS RUBY TUESDAY DRESS PATTERN HACK #1 - Cross Over Bodice

This is the first in a series of Pattern Hacks for my new pattern - Miss Ruby Tuesday Dress - you'll learn how to adapt your bodice to a Cross Over bodice.  

This feature is particularly good if you are breast feeding.  But it's also a lovely feature to bring attention to the bodice area - if you have big boobs or small, it doesn't matter.  It's a beautiful feminine feature to add to your dress pattern.

The VERY first thing you need to do is to make sure you have done a Toile (mock up) of the MRT (Miss Ruby Tuesday) pattern to see that it fits perfectly on you.  This step is important because if your base pattern isn't a good fit then the pattern hack won't be either.  

A good place to start to get ideas for a particular style you'd like to create is to GOOGLE images.  For this particular lesson I googled - Cross Over Dresses - and I came up with this:


It amazing what you can find on Google.

Now for this lesson I've chosen to start simple and the 2 Cross Over bodice hacks you'll be creating are:

1.  Basic Cross Over Bodice....there are no tucks and the right and left side bodices pieces are the same.


2.  Cross Over Bodice With Side Tucks.......this is a bit more feminine and has a softer look.  You can see that the right front pattern piece has the side tucks but the left doesn't, so you'll need to do 2 patterns.


But before we get started I thought I'd show you some of the many different cross over styles you can do.  They can all be done on the Miss Ruby Tuesday Dress pattern too!


Ok, now that I've got you excited with the possibilities for the Cross Over bodices we'll get started.

What You'll Need

  • Front Bodice Miss Ruby Tuesday Pattern
  • Extra paper to make your pattern alterations on
  • Tracing Wheel
  • Pencil
  • Scissors
  • Tape Measure
  • Ruler
  • French Curve (optional)


1.  Basic Cross Over Bodice Hack


  • Start with your front bodice pattern placed on another piece of paper that's folded in half.  The pattern needs to be big enough to accommodate the front bodice pattern.  We are going to be making a full front pattern as the shape of the Cross Over starts on one half of the bodice and extends to the other half of the bodice.
  • The Cross Over pattern starts off as being a V neck shape on half the pattern and then extended down to the other half of the pattern to the side seam.  You'll notice that the bodice pattern already has a V neck option.  You can use that as your starting point if it's the right depth for you.
  • First you need to measure down from the hollow in your neck to the point where you'd like your Cross Over to meet at the CF (Centre Front).  If the V point on the pattern is where you want your Cross Over to meet - great.  If not then mark in your new point and draw a line up to the shoulder/neck point.......similar to the V that's already there.


  • Trace off the pattern with a tracing wheel and fold out.  You are then left with a complete front bodice with a V neckline.


  • Measure 10cm/4" from the waist/side seam point up the side seam and mark.
  • Draw a slight curved line up to the V point at the CF.
  • You line will probably look something like the image above.
  • You'll then need to redraw the V neckline so that the line then continues on smoothly down to the side seam.
  • Your front bodice will now look like the image above.
  • Fold your pattern in half again and, with your tracing wheel, trace your new neckline to the other side of the pattern.
  • Your pattern will now be looking like the image above.


  • Now trace out your new front cross over bodice.  Please don't cut the original pattern up as you need this pattern to refer back to.  So take the time and always trace out new alterations to the pattern.
  • Mark on your pattern - CF line, what it is, how many to cut and what size.  Also, mark in the CF notch at the waist line.
  • As this first style has the same right and left front pattern you will be cutting one pair.  

2.  Cross Over Bodice With Side Seam Tucks

  • You'll be drawing 3 lines across your bodice.

  • The bottom line starts at 2.5cm/1" above the waist on the right hand side side seam and goes over to the other side seam - about 1/3 of the way up the side seam.  Draw in the line.
  • The second line measure up 2.5cm/1" on the right hand side    seam and then make a mark on the left hand side seam a1/3 of the way up.


  • The third line starts 2.5cm/1" up from the last line on right hand side seam.  Make a mark at the corner of the side seam and armhole seam then rule the third line in.  
  • Now that you've got your 3 line ruled in it's time to do a patternmaking method called - Slash and Spread.

  • Place your pattern on another piece of paper.
  • Cut into the bottom line - leaving the left side seam still connected. Tape the bottom part of the pattern to secure it in place.
  • Then spread the top part of the pattern pattern up 2.5cm/1".
  • Now repeat this process with the middle line.  Tape in place to keep it secure.
  • Then finally do this again with the top line.  When you cut the line make sure the junction of the side seam and armhole are still connected.
  • Tape all the pattern to the paper underneath.
  • The tucks will be folding up when you make your Cross Over bodice.  So fold the tucks up one at a time and, with your tracing wheel, draw over the side seam to create the tuck.  Do this with the middle tuck then the top tuck.

  • Once you've done that and marked in the tuck notches your pattern will look something like the image above.
  • Make sure you have still got your CF & Straight Grain line and also the information of the pattern.  You'll only be cutting one of this pattern so mark on this pattern 'Right Side Up' as that is how it's to be cut out on your fabric.

  • You will now have your right hand side pattern piece with the tucks and the left hand side pattern piece without the tucks - which will be placed under the right hand side pattern piece.


  • Lastly, you'll need to make your neck band.  Measure the complete neckline divide by .85.  This measurement will be your neckband length and the width will be 4cm/1 1/2".


That's it.  You've done your first pattern hack on the Miss Ruby Tuesday Dress pattern.  Enjoy making your Cross Over Dress and I would love to see pics in the facebook group. 

If you like what you see but don't have the pattern - you can find Miss Ruby Tuesday Dress pattern HERE.

If you have any questions or hack suggestions please put them in the comments below or email me at 1puddlelane@gmail.com.

Happy Sewing!
Print Friendly and PDF


Ann Martin is the owner/designer of 1 Puddle Lane - Pattern Studio.
With over 30 years experience in the Fashion Industry she brings a wealth of knowledge on everything from Patternmaking and Sewing to Design.
Ann currently lives in Australia and is always working on new pattern designs to create.   1puddlelane.com.au